

Quality
This stage has the potential to add many hours to your
DVD ripping project. But if you complete it, your video
file(s) will fit perfectly on just the right number of CDs.
The video will also be of nearly optimal
quality.
If you skip this stage the video will still look fine, but
it may be under compressed or over compressed. You won't
know if you're using too many CDs, or too few. The file(s)
will also be undersized by a few megabytes.
Completing this stage is recommended. If you wish to skip
it, however, click
here.
Go to the Start menu and open
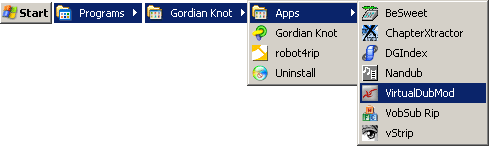 VirtualDubMod.
Click  if there is a warning.
From the
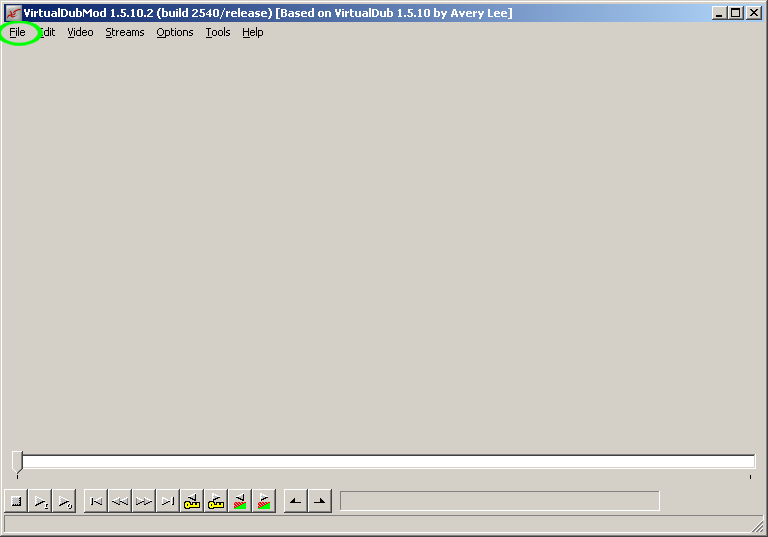 menu, select
 .
.
Navigate to the ripping folder and open
 script.avs.

Drag the  to different locations within the
end credits. If they are plain text-only credits, open
to different locations within the
end credits. If they are plain text-only credits, open
![]() video notes.txt and
type in the line credits begin:________.
Fill in the blank with the
frame number
where the credits begin.
video notes.txt and
type in the line credits begin:________.
Fill in the blank with the
frame number
where the credits begin.
If the credits are anything more complicated than regular
scrolling text on a plain background, don't bother to make
a note. If you are encoding a series of episodes, don't
bother to make a note.
IMPORTANT: At this point you must make
sure the picture looks good.
Drag the  to different locations in order to
check the picture for brightness, saturation, and
black borders. If it is too bright, edit
script.avs to
decrease the
YlevelsS brightness value. (The default is
1.2.) If the picture is not bright enough,
increase that value.
to different locations in order to
check the picture for brightness, saturation, and
black borders. If it is too bright, edit
script.avs to
decrease the
YlevelsS brightness value. (The default is
1.2.) If the picture is not bright enough,
increase that value.
If the picture looks washed-out, increase the
Tweak saturation level. (The
default value is 1.2.) If the picture is too
colorful, with lots of loud reds/greens/blues, decrease the
saturation.
If any black borders are visible, go back to the Script
stage and increase the relevant cropping values. (Check the
right side of the image carefully--Gordian Knot sometimes
leaves a border there that is not apparent during the
Script stage.) If the picture is squashed or stretched,
that's fine--as long as you carefully followed the
directions in the Script stage.
Always save script.avs and
re-open it in  VirtualDubMod after editing, so you can
see how your changes have affected the picture. When
it looks good, continue below.
VirtualDubMod after editing, so you can
see how your changes have affected the picture. When
it looks good, continue below.
From the
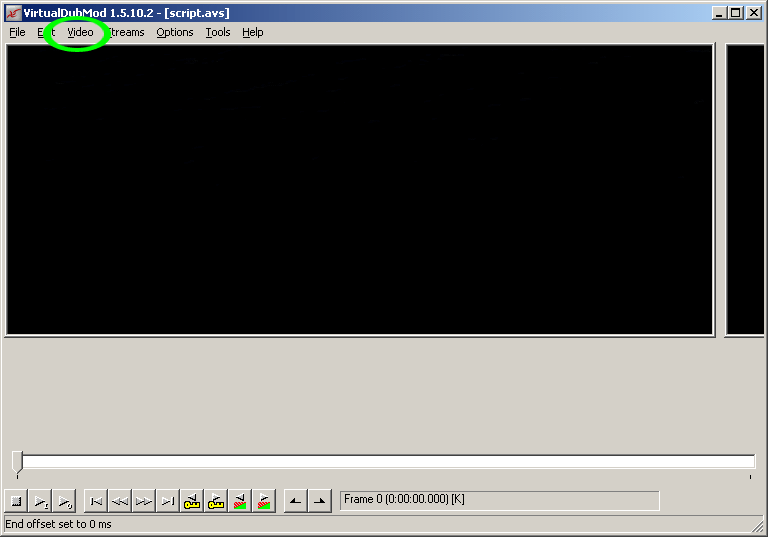 menu, select
 .
.
In the video compression menu, select
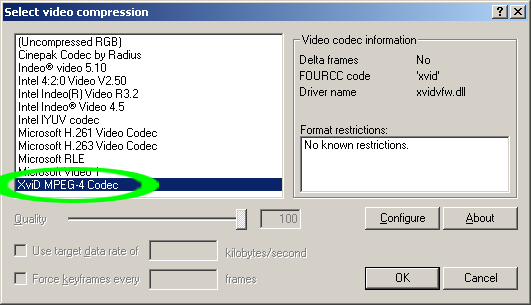 .
.
Click
 .
.
Click
 .
.
From the "Encoding type" menu, select
 .
.
Click the
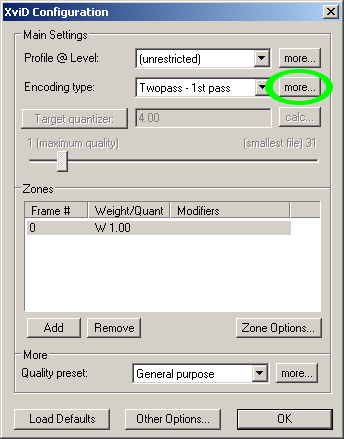 button next to
 .
.
IMPORTANT: Uncheck
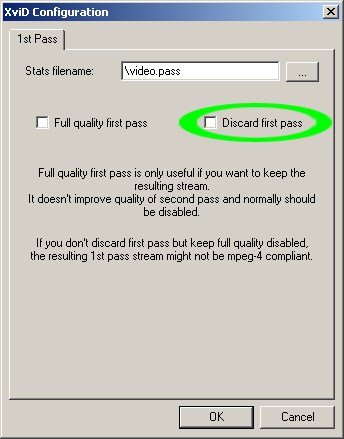 .
.
Click
 .
.
Click the
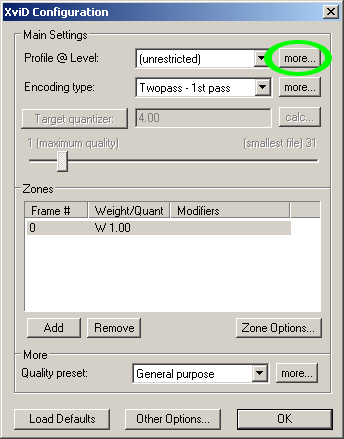 button next to
 .
.
If you are using 1 CD or encoding a
series of episodes, skip past the
white section.
From the "Quantization type" menu, select
 .
.
Click 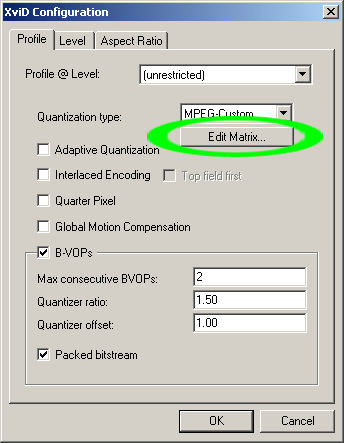 .
.
Click 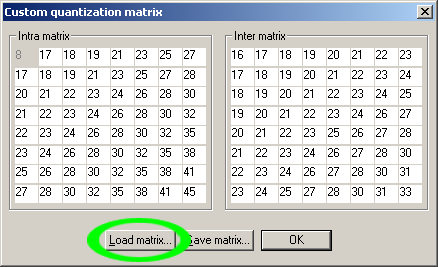 .
.
Navigate to C:\Program
Files\GordianKnot\qmatrix.
If you are using 2 CDs, select
![]() HVS Best
Picture.cqm.
HVS Best
Picture.cqm.
If you are using 3 CDs, select
![]() Didees
SixOfNine-HVS.cqm.
Didees
SixOfNine-HVS.cqm.
Click
 .
.

Check  .
.
Uncheck
 .
.
Click
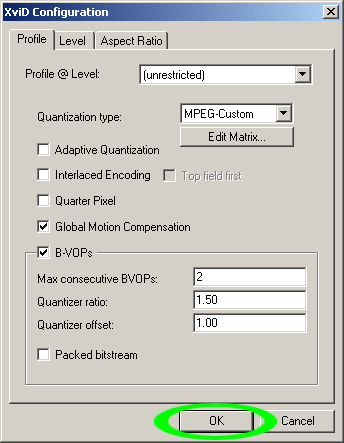 .
.
From the "Quality preset" menu select
 .
.
Click the  button next to the
"Quality preset" menu.
button next to the
"Quality preset" menu.
From the "VHQ Mode" menu, select
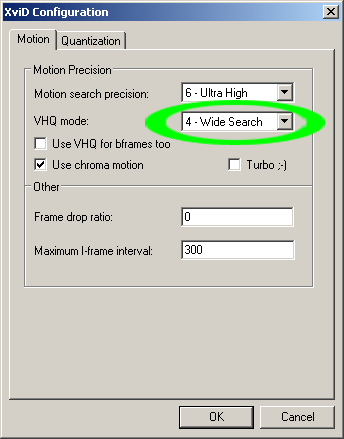 .
.
 if the DVD
is telecined
NTSC.
if the DVD
is telecined
NTSC.
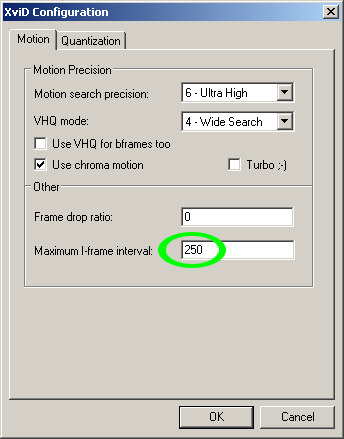 if the DVD
is PAL.
if the DVD
is PAL.
 if the DVD
is regular or
interlaced
NTSC.
if the DVD
is regular or
interlaced
NTSC.
Click
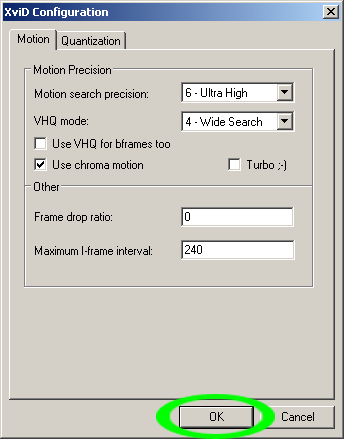 .
.
If the end credits were composed of simple text on a
plain background, follow the instructions in the
gray section.
If the end credits were more complicated, or if you are
encoding a series of episodes rather than a feature length
movie, ignore the gray section.
Click
 .
.
Highlight the newly created zone and click
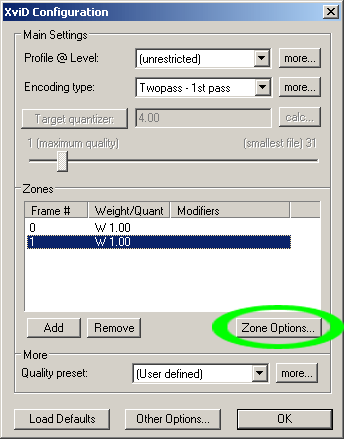 .
.
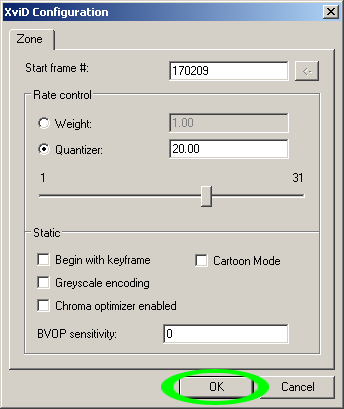
Copy the "credits begin" frame number from
![]() video notes.txt and
paste it in:
video notes.txt and
paste it in:
 .
.
Select
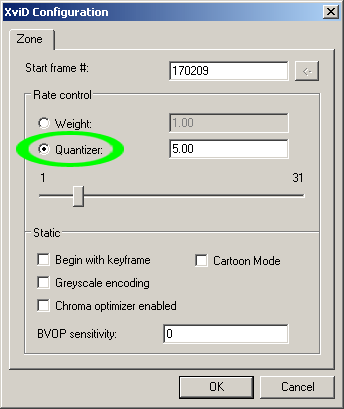 and enter a value of
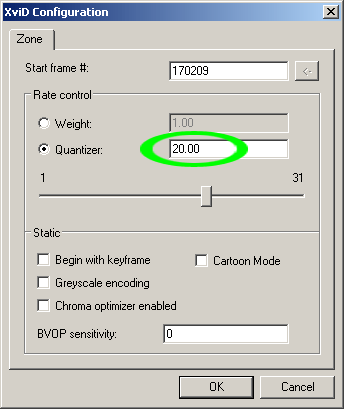 .
.
Click
 .
.

Click
 on the
configuration screen.
on the
configuration screen.
Click
 on the
compression screen.
on the
compression screen.
Go to the
 menu and select
 .
.
Check 
Navigate to the ripping folder, and name the file
firstpass.avi.
Click
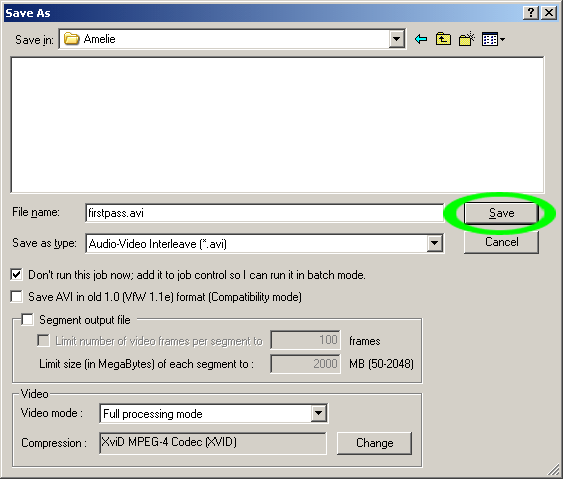 .
.
From the
menu select
 .
.
Click
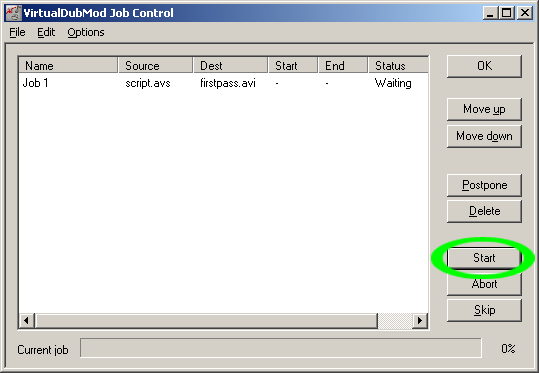 .
.
VirtualDubMod will now begin encoding. It will also create
a ![]() video.pass file in
the root directory. Do not delete this file!
video.pass file in
the root directory. Do not delete this file!
Encoding the first pass file can take up to 8 hours for a
feature length movie, depending on the speed of your CPU
and the playing time of the video.
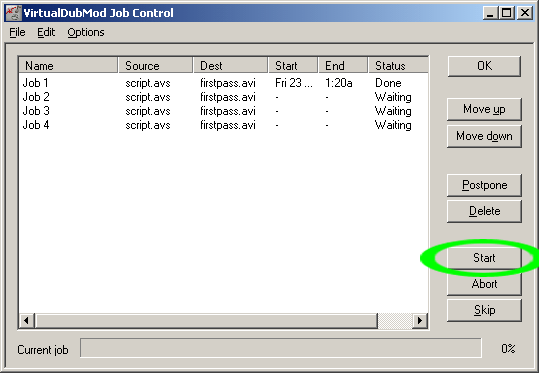
When VirtualDubMod finishes, click
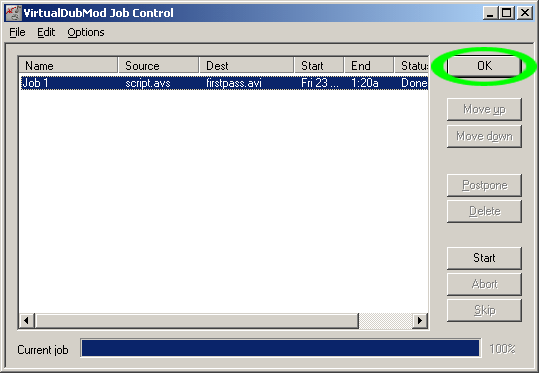 on the Job
Control screen.
on the Job
Control screen.
Open ![]() firstpass.avi with
firstpass.avi with
![]() VLC
Media Player.
VLC
Media Player.
Make sure there are no black borders or visual glitches
(If the DVD was anamorphic the video will be distorted, but
that is ok.) You can select "Save Image" in Media Player
Classic and examine the image to check for borders.
IMPORTANT: If there are any problems, you
must fix them and re-encode the first pass
before continuing.
If you would like to determine the compressibility of
the video file in order to optimize visual quality, follow
the instructions in the
purple sections.
If you want to risk sacrificing quality in order to save
time, or if the purple sections look too complicated, you
can scroll past them.
Fill in the relevant cells in this spreadsheet, or manually perform the following calculations based on the number of CDs being used:
USABLE CD
SPACE
1/4 CD............................179200
KB
or
1/3 CD............................238933
KB
or
1/2 CD............................358400
KB
or
1 CD..............................716800
KB
or
2 CDs............................1433600
KB
or
3 CDs............................2150400
KB
minus
main.ogg..........................123906
KB
minus
commentary.ogg.....................61742
KB
equals
usable CD space..................1247952
KB
If there are other audio files, subtract them as well.
COMPRESSION
RATIO
usable CD space..................1247952
KB
divided by
firstpass.avi....................1617218
KB
equals
compression ratio......................0.77
Now, rename ![]() firstpass.avi so
that the compression ratio and number of CDs appear in
the file name: firstpass_0.77_2CDs.avi, for
example. This will allow you to easily identify it and
prevent it from being overwritten if additional first
pass files are created.
firstpass.avi so
that the compression ratio and number of CDs appear in
the file name: firstpass_0.77_2CDs.avi, for
example. This will allow you to easily identify it and
prevent it from being overwritten if additional first
pass files are created.
If you are encoding a series of episodes, rename the file
to include the compression ratio along with the CD
fraction: firstpass_0.41_.25CDs.avi, for
example.
If the compression ratio is lower
than 0.25 and you are encoding a feature length movie,
increase the number of CDs you are using by one. Then begin
again at the Audio stage.
(Unless this takes your total to 3 CDs, in which case you
should begin at the
Script stage instead.) If
you are encoding a series of episodes, move to a larger CD
fraction and begin again at the
Script stage.
If the compression ratio is 0.25 to 0.49, go back to the
Audio stage and re-encode
the main audio at a lower quality setting. (Don't go lower
than 0.100, though.) When you get to the Script stage,
follow the normal instructions for aligning the resolution
slider--then move it three or four additional spaces to the
left.
If the compression ratio is 0.50 to 0.90, change the name
of the file back to ![]() firstpass.avi and
continue below. The final file should look fine. (If
it does not, you can come back to this stage later and
follow the directions in the previous paragraph to
increase the ratio.)
firstpass.avi and
continue below. The final file should look fine. (If
it does not, you can come back to this stage later and
follow the directions in the previous paragraph to
increase the ratio.)
If the compression ratio is above 0.90 and you are
encoding a feature length movie, it is safe to remove a CD
and begin again at the
Audio stage--unless you
don't mind using more CDs than is really necessary. If you
are encoding a series of episodes, move to a smaller CD
fraction and begin again at the
Script stage.
If the compression ratio is above 0.90 and you're already
using only 1 CD for a feature length movie, you are free to
use higher quality audio and/or a larger picture. Begin
again at the Audio stage
if you would like to do so. Only this time increase the
audio quality by a few half-steps. In the Script stage,
follow the normal instructions for aligning the resolution
slider--then move it three or four additional spaces to the
right.

If you are encoding a series of episodes, follow the
instructions in the brown
sections.
If you are encoding a feature length movie, ignore the
brown sections.
From the
 menu, select
Navigate to the ripping folder for the second
episode and open script.avs.
From the
menu, select
.
Click
.
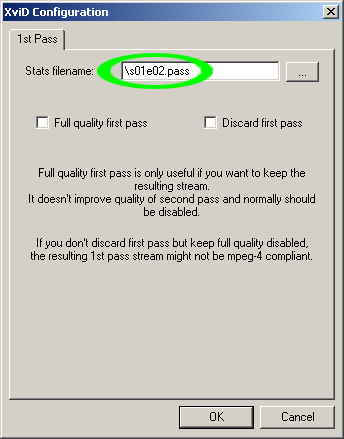
Click the
button next to
.
Rename video.pass to correspond to the episode
number:
Click
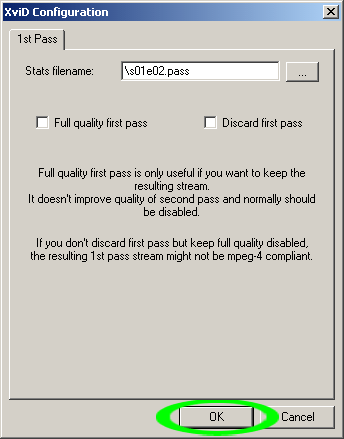 on the 1st Pass
screen.
on the 1st Pass
screen.
Click
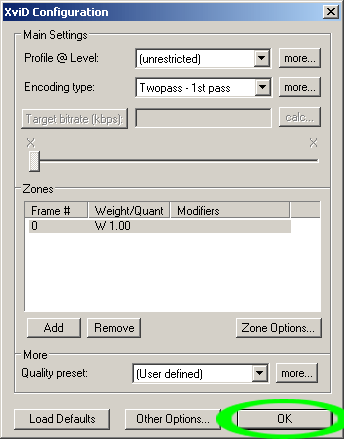 on the
configuration screen.
on the
configuration screen.
Click
on the
compression screen.
From the  menu select
.
menu select
.
Navigate to the ripping folder for the second
episode, and name the file firstpass.avi.
Click
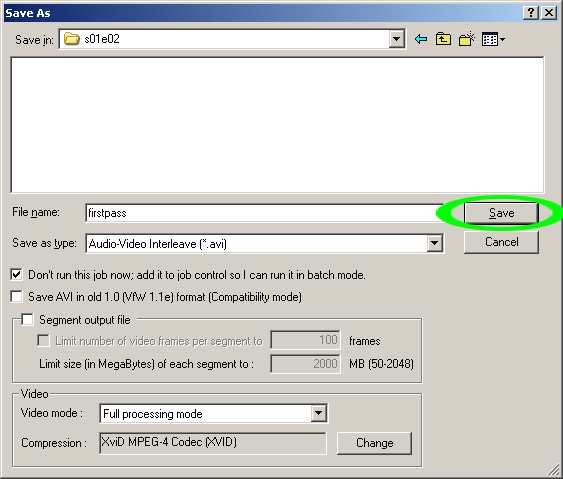 .
.
Repeat these steps for the third episode, the fourth,
etc., until each one has been added to the queue. Always be
sure to save to the correct folder.
When you have added all the
episodes,
go to the
menu and select
.

Click
 to begin
encoding.
to begin
encoding.
Encoding all the episodes will take up to 8 hours,
depending on the speed of your CPU. Do not delete any of
the ![]() s__e__.pass files
that will be created in the root directory!
s__e__.pass files
that will be created in the root directory!
During the third part we will mux the first pass video
file(s) with the audio and other files.
Due to the nature of the Matroska container, this is the
only reliable way to determine how much overhead will be
introduced.
Even though this is a preliminary muxing, it should be
done with all the same files and options as the final
muxing, or the overhead calculation may be off. The
settings file generated at the end of this stage will also
be used for the final muxing, so you won't have to do this
twice.
Go to the Start
menu and open
 mkvmerge GUI.
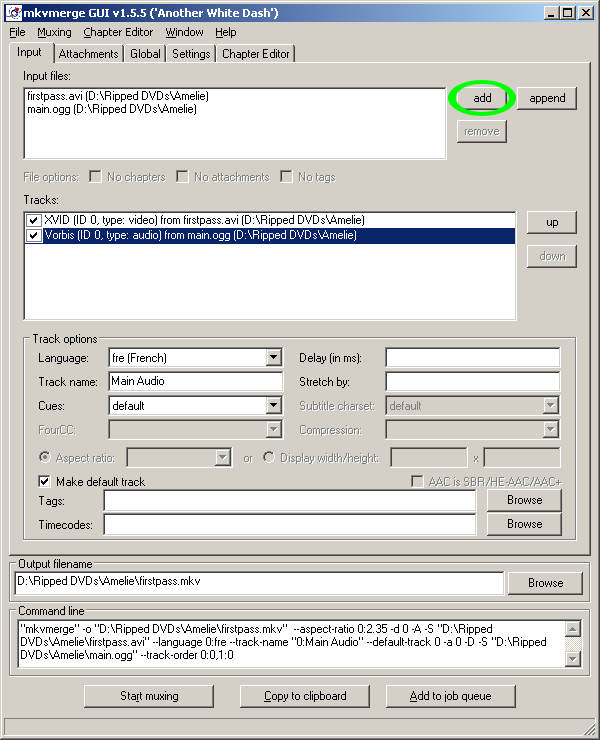
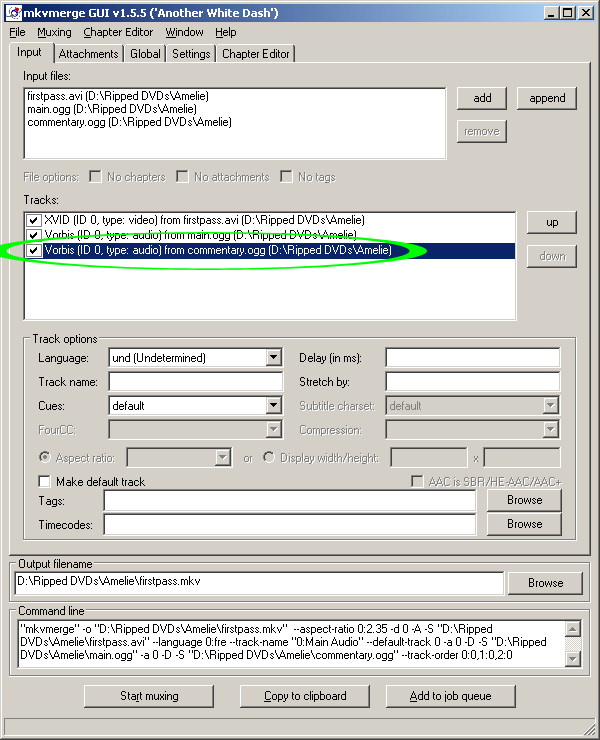
Click  .
.
Navigate to the ripping folder and select
![]() firstpass.avi.
firstpass.avi.
Click on firstpass.avi in the
Tracks section to
highlight it.
Specify the
 if necessary.
Open ![]() video notes.txt and
look at the "aspect ratio" line.
video notes.txt and
look at the "aspect ratio" line.
If it is 16:9, select

If it is 2.35:1, select
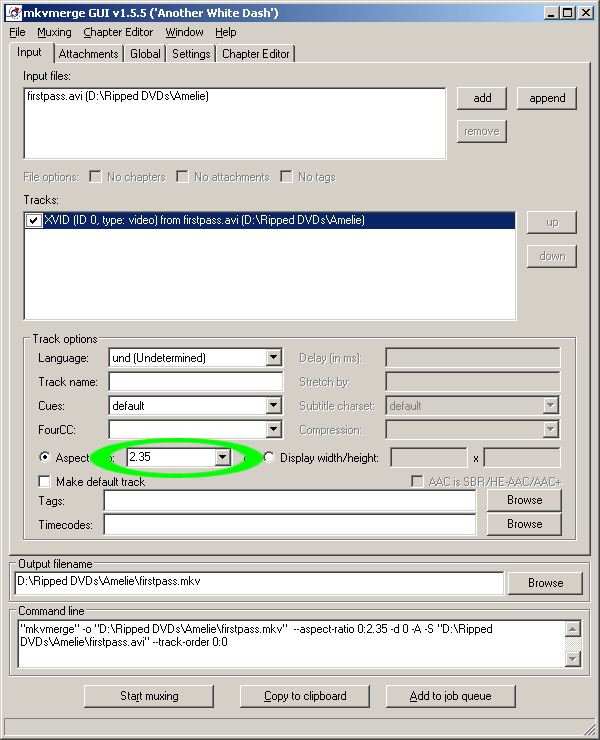
If there is no "aspect ratio" line, leave the field
blank.
Click
 .
.
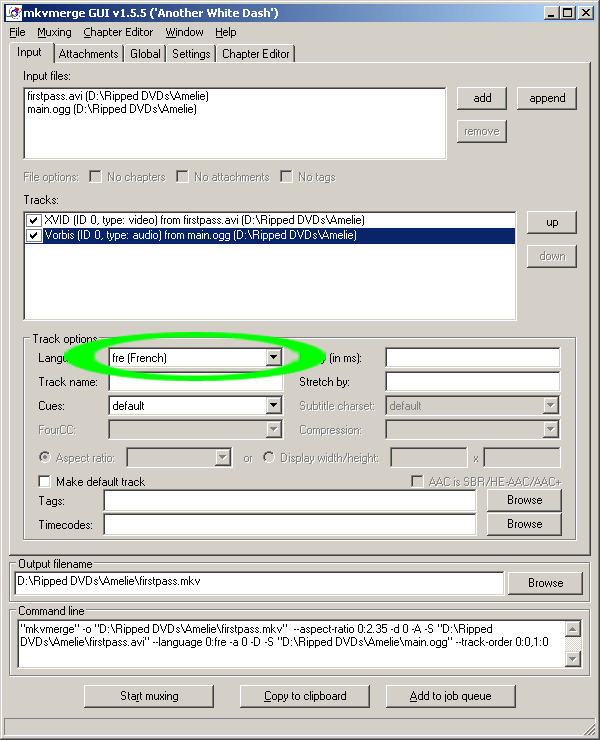
Add ![]() main.ogg.
main.ogg.
Click on main.ogg in the
Tracks section to
highlight it.
Select the proper language:
Name the track
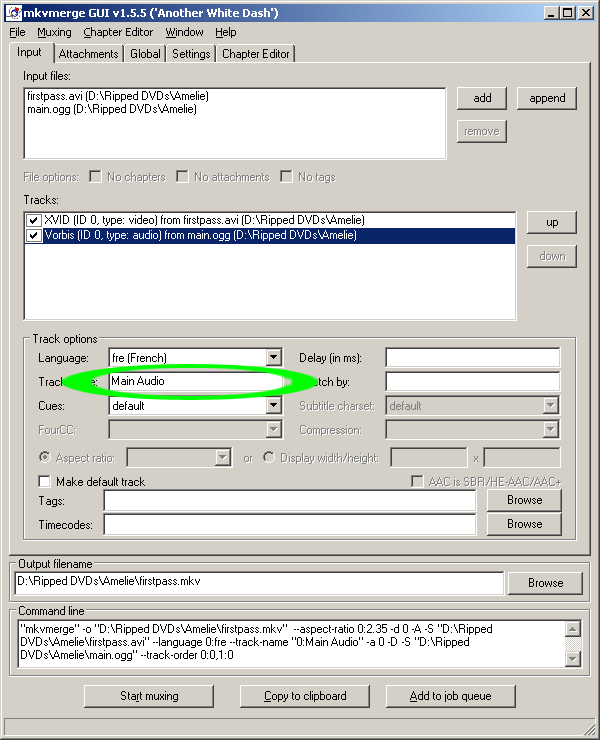 .
.
If there will be additional audio tracks, check
 .
.
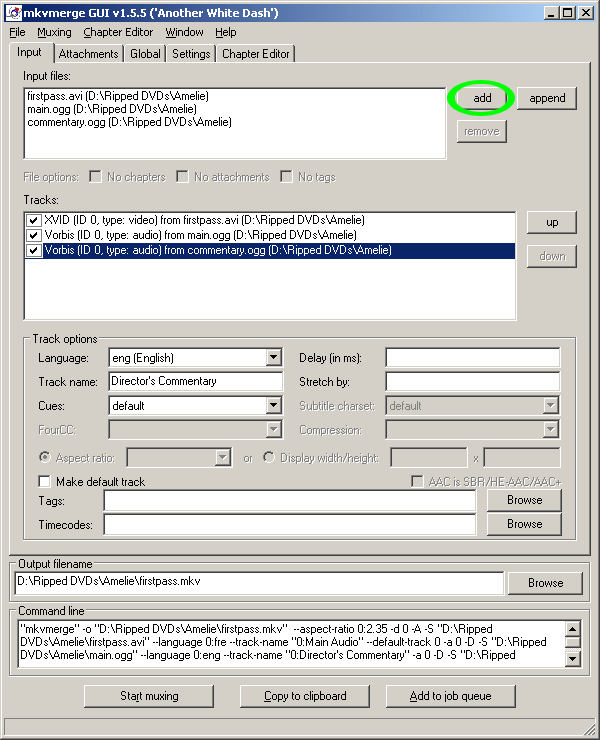
If you have a ![]() commentary.ogg file,
click
commentary.ogg file,
click
 and select
it.
and select
it.
Click on commentary.ogg in the
Tracks section to
highlight it.
Select the proper language:

Name the track
 or
something similarly descriptive.
or
something similarly descriptive.
Add any additional audio tracks in the same manner,
selecting them in the order of importance.
If you have a ![]() subtitles.srt file, click
subtitles.srt file, click
 and select
it.
and select
it.
Click on subtitles.srt in the
Tracks section to
highlight it.
Select the proper language:

Name the track
 or
something similarly descriptive.
or
something similarly descriptive.
If there will be additional subtitle streams, check
 .
.
Add any additional subtitle streams in order of
importance.
From the
 menu, select
 .
.
Load ![]() VTS_01 - Chapter
Information - OGG.txt.
VTS_01 - Chapter
Information - OGG.txt.
Click the name of the first chapter to
highlight
it.
If it has no name or is incorrect, type in the correct
name:

Then click on the next chapter, and repeat until all names
are entered. If you don't know the chapter names, you may
be able to find them at
All Movie Guide or
Barnes & Noble.
If you are encoding a series of episodes and they don't
have chapters, (or if they only have one chapter each)
don't worry about following any of the instructions
regarding chapters.
Check the final chapter to make sure it begins at the
right time. If it does not, the timecodes must be
adjusted.
In this example the
last two chapters begin past the end of the movie, which is
only 02:01:51 long. This can happen when the DVD has one or
more "invisible" chapters.
The example also shows 18 chapters when the movie only has
17.
Delete the extra chapter by highlighting it and clicking
 .
.
To find the invisible chapter(s), you must watch the DVD
with the timer on and look for time skips between
chapters.
It so happens that the DVD in the example has an invisible
chapter between chapters 7 and 8, where the timer skips
forward by 00:07:44.
To fix this, highlight the chapter right
after the invisible chapter and click
 .
.
Then subtract the length of the invisible chapter and
click
 .
.
Repeat this process for each subsequent chapter until the
last one seems
correct.
Go to the  menu and select
 .
.
Name the file chapters.xml.
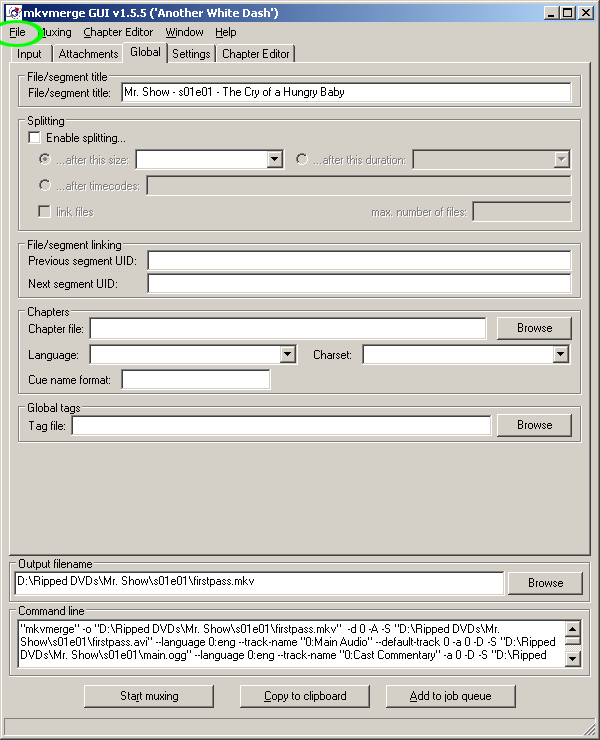
Go to the
 tab.
tab.
Enter the name of the movie.
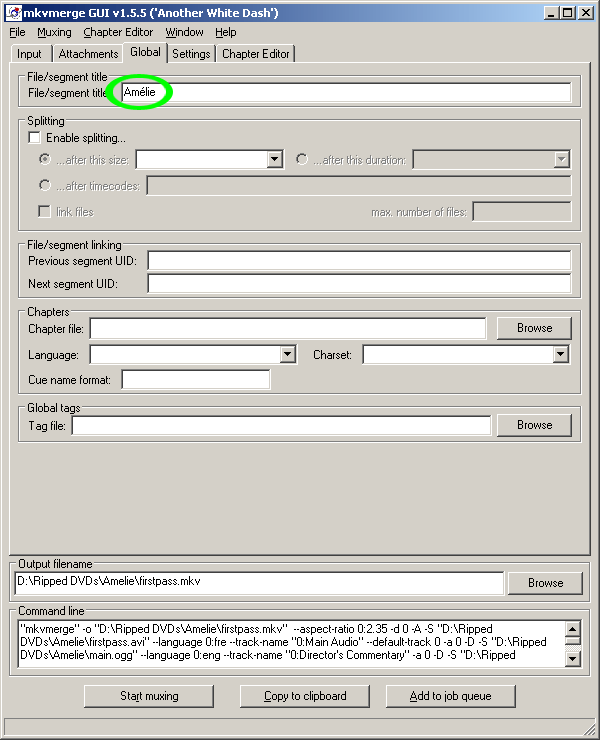
If you are encoding a series of
episodes, use the format
<series name> - s__e__ - <episode
name>,
where the first blank is the season number and the second
blank is the episode number.

Click
 in the
Chapters section.
in the
Chapters section.
Open ![]() chapters.xml.
chapters.xml.
Select the proper language:

If you are encoding a series of episodes, scroll down to
the brown section.
If you are encoding a feature length movie, continue.
From the
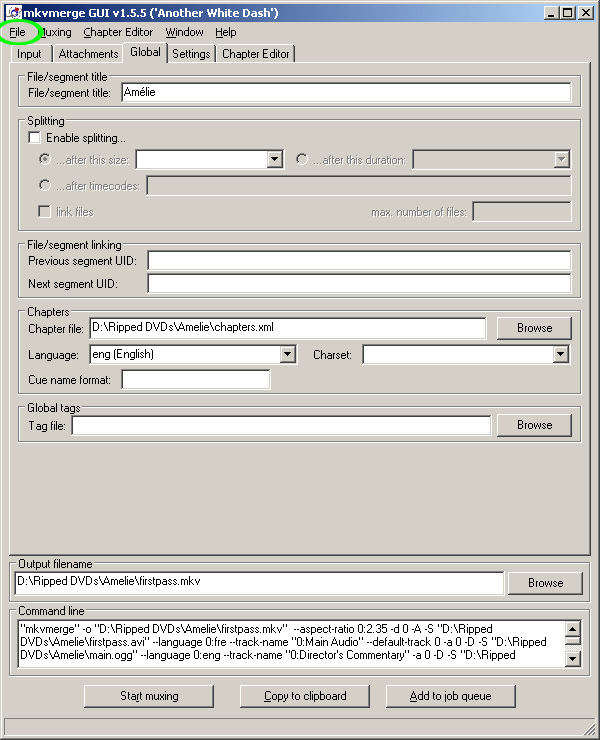 menu, select
 .
.
Save the settings as muxing.mmg.
When you are ready, click
 .
.
Muxing will take anywhere from 5 to 15 minutes.
Skip past the brown sections.
Click
 .
.
Create a new ![]() text file in the ripping folder.
text file in the ripping folder.
Open the text file and press Ctrl+v to paste in
the command line.
From the
 menu, select
 . This will clear all
the fields.
. This will clear all
the fields.
Go to the
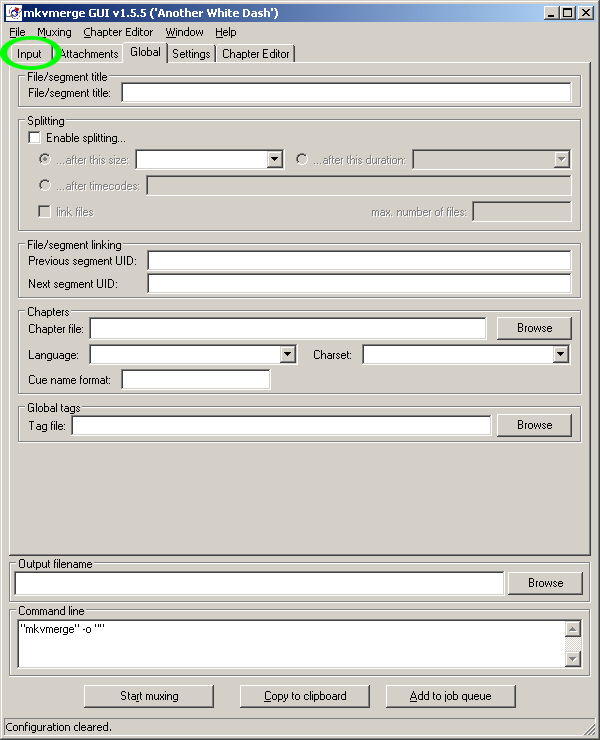 tab.
tab.
Add the files for the second episode, then copy
the command line into the text file.
Repeat for each subsequent episode.
(Click here to go back to the
beginning of the muxing instructions.)
Once a line has been added for every
episode, save the text file and rename it
![]() muxing.bat.
muxing.bat.
Double-click ![]() muxing.bat to mux
all the firstpass files. Muxing will take about 5 to
15 minutes.
muxing.bat to mux
all the firstpass files. Muxing will take about 5 to
15 minutes.
You will need this file later, so don't delete it.
Once muxing is complete, the ripping folder(s) will
contain a file named ![]() firstpass.mkv. Open
it with
firstpass.mkv. Open
it with ![]() VLC Media
Player and check the video, audio,
chapters, and subtitles for quality and sync. (If you
have any problems with playback, please see the
Viewing stage for
help.)
VLC Media
Player and check the video, audio,
chapters, and subtitles for quality and sync. (If you
have any problems with playback, please see the
Viewing stage for
help.)
Any problems should be fixed now and the files re-muxed
before the overhead is calculated.
When everything is in order, fill in the relevant cells in this spreadsheet, (it's the same one from the purple sections) or manually perform the following two calculations:
OVERHEAD
firstpass.mkv....................1801121
KB
minus
firstpass.avi....................1617218
KB
minus
main.ogg..........................123906
KB
minus
commentary.ogg.....................61742
KB
equals
overhead...........................-1745
KB
If there are other audio files, subtract them as well.
(This applies to both calculations.)
VIDEO SIZE
1/4 CD size.......................179392
KB
or
1/3 CD size.......................239189
KB
or
1/2 CD size.......................358784
KB
or
1 CD size.........................717568
KB
or
2 CD size........................1435136
KB
or
3 CD size........................2152704
KB
minus
main.ogg..........................123906
KB
minus
commentary.ogg.....................61742
KB
minus
overhead...........................-1745
KB
equals
video size.......................1251233
KB
The numbers above have been adjusted to size your file(s)
at about 700 to 701 MB per CD.
Open ![]() video
notes.txt.
video
notes.txt.
Replace the old video size value with the new one,
(1251233 in the example) then save the file.
If you're encoding a series of episodes, perform the
overhead calculation for each one, or use the spreadsheet.
Make a note of each episode's video size in
![]() video notes.txt and
save it.
video notes.txt and
save it.

Close VirtualDubMod and mvkmerge GUI and proceed to the next stage.
.

